
Why Your Decking Sander Choice Makes or Breaks the Job

Well, hello there. It’s Tony back in the shop. If you’re reading this, I’m guessing you’re staring at a deck that looks a bit more like a graying driftwood heap than the backyard sanctuary you envisioned. I’ve been there. In fact, my first deck project was a disaster. I thought I could tackle a 500-square-foot wrap-around porch with a little palm sander I’d bought on sale. Three days later, my hands were vibrating even when I wasn’t holding the tool, and the deck still looked like it had been chewed on by a beaver.
Choosing the right decking sander isn’t just about speed; it’s about saving your back, your ears, and the wood itself. If you’re just starting out in this hobby, you might want to check out my guide on 7 Essential Woodworking Tools for Beginners before you spend a dime. But if you’re ready to get that deck looking like it belongs in a magazine, let’s dive into the grit and dust.
The Importance of Proper Surface Preparation for Deck Staining
Before you even touch a sander, we need to talk about prep. I learned the hard way that if you don’t prep, you’re just polishing dirt. You see, wood out in the elements gets a layer of ‘dead’ fibers. If you just slap stain over that, the stain will peel off within a year. You might as well be throwing your money into a wood chipper.
First thing I do is grab my Stanley Tape Measure and walk the perimeter. I’m looking for boards that are rotting or warped beyond saving. If a board is soft enough to poke a screwdriver through, it’s gotta go. If you find yourself needing to build a whole new section, I’d highly recommend looking into Ted’s Woodworking Plans for some structural guidance. He’s got thousands of designs that helped me when I was first figuring out joist spacing.
Once the bad boards are swapped out—usually using my trusty Skil Circular Saw or my heavy-duty Makita Circular Saw for the cleaner cuts—you need to clean it. Use a deck cleaner, let it dry for at least 48 hours, and make sure every nail or screw is countersunk. There is nothing that ruins a sander belt faster than hitting a galvanized nail head at 2,000 RPM. It’s a spark, a snap, and a lot of cursing.
Belt Sanders vs. Random Orbital Sanders: Which is Best for Decks?
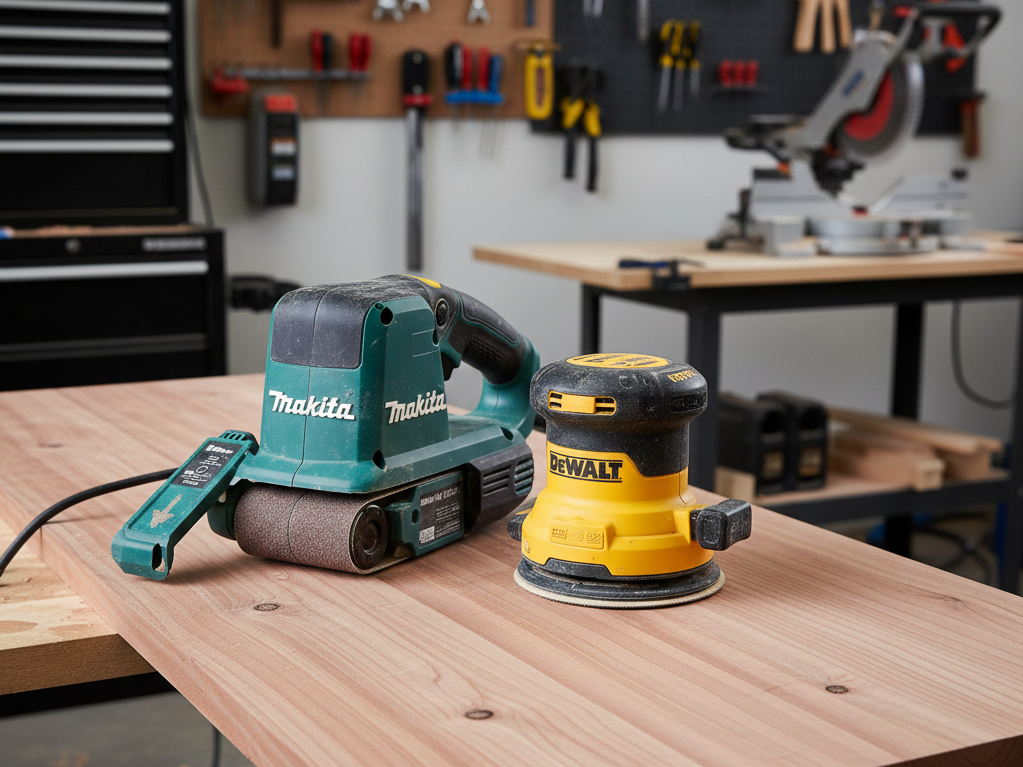
This is the age-old debate in the woodworking community. Do you want the raw power of a belt sander or the finesse of a random orbital? After twenty years of doing this, my answer is: both. But they serve very different purposes.
A belt sander is a beast. If your deck boards are uneven or have years of thick, peeling paint, a belt sander like the Makita 9403 4″ x 24″ Belt Sander is your best friend. It’s heavy, it stays flat, and it eats wood for breakfast. You have to be careful, though. If you stay in one spot too long, you’ll dig a hole halfway to China. I learned that on my neighbor’s deck back in ’04. I had to replace the whole board and buy him a case of beer to make up for it.
On the other hand, the random orbital sander is for the finish. Once the belt sander has leveled everything out, you go over it with something like the DEWALT 20V MAX XR Random Orbit Sander. This tool moves in a way that doesn’t leave those nasty swirl marks. If you’re on a tighter budget, the Bosch Orbital Sander or the Black and Decker Orbital Sander will get the job done, though they might take a little longer. For a deck, the goal is to get the wood smooth enough to absorb stain evenly, not to make it as smooth as a dining room table.
Top-Rated Heavy-Duty Sanders for Large Deck Areas
If you have a massive area to cover, you need professional-grade equipment. I’ve tried the cheap stuff, and they usually burn out by the time you’re halfway across the porch. When I’m doing a large deck, I always reach for my Makita 9403. It’s quiet (for a sander) and the dust collection is actually decent, which saves your lungs a bit of trouble.
Another heavy hitter is the Dewalt drill set—wait, why am I mentioning drills? Because before you sand that large area, you’ll likely need to tighten down hundreds of screws. I prefer the Dewalt because the batteries last forever. If you’re looking to save money on your batteries, by the way, I once used the EZ Battery Reconditioning method on some old Ryobi packs and it actually worked. Saved me a couple hundred bucks right there.
For the large flat surfaces, some folks rent a floor sander. I don’t recommend it for decks. Decks have gaps between the boards, and those big machines can catch an edge and tear themselves apart. Stick to a high-quality hand-held belt sander and work board by board. It’s slow, humble work, but it’s the only way to ensure quality. Speaking of doing things the right way, I’ve made my share of errors—like when I built my first shed. You can read about those 5 Expensive Shed Building Mistakes I Made so you don’t repeat them.
How to Sand Deck Railings and Tight Corners Efficiently
The flat boards are the easy part. The railings? That’s where woodworkers go to lose their sanity. You can’t fit a big belt sander between those spindles. For the railings, I usually switch to a smaller tool like the Black and Decker Jigsaw (if I’m trimming decorative edges) but for sanding, a small orbital is king.
I use the Black and Decker Orbital Sander for spindles because it’s light. Your arms will get tired holding a heavy DeWalt up at shoulder height for four hours. For the really tight corners where the railing meets the post, I often have to resort to hand sanding with a block or using a detail sander. I’ve used a Swanson Speed Square to help me mark out any boards that need to be trimmed or adjusted in those tight spots.
Pro tip: If you have a lot of decorative woodwork on your railings, don’t try to sand it back to bare wood. Just scuff it enough so the new stain can grab hold. If the wood is in really bad shape, it might be easier to replace the spindles entirely. I keep a Ryobi drill set handy for quick swaps like that.
Must-Have Safety and Ergonomic Gear for Deck Refinishing

Listen, I’m an old-timer, and I used to think safety gear was for folks who didn’t know what they were doing. Then I woke up one day with a cough that wouldn’t quit and a constant ringing in my ears. Don’t be like young Tony.
Sanding pressure-treated wood is dangerous. That dust is full of chemicals. You absolutely need a 3M Rugged Comfort Quick Latch Half Facepiece Respirator. It’s comfortable enough that you’ll actually wear it. And for the noise? The 3M WorkTunes Connect Hearing Protection is a game-changer. I can listen to my favorite bluegrass or a podcast while I work, and it blocks out the scream of the Makita.
Also, think about your knees. If you’re sanding the floor, you’re going to be down there for a long time. I usually keep a Mr Heater Buddy in the garage if I’m working in the shoulder seasons, but for the deck itself, I just make sure I have good pads. If it gets cold, I’ve even been known to throw a Thermal Blanket over my legs during breaks.
Final Thoughts on Picking Your Decking Sander
Refinishing a deck is a big job, but it’s one of the most rewarding things you can do for your home. There’s something about seeing that fresh grain pop under a new coat of oil that just feels right. Take your time, use the right tools—whether it’s a Bosch Jigsaw for the custom cuts or a Harbor Freight Clamps set to hold a board while you sand the edge—and don’t skip the prep.
If you’re feeling overwhelmed by the sheer number of projects you want to tackle, I’d suggest reading my Ted’s Woodworking Review to see if having those 16,000 plans would help you get organized. Whatever you do, just get out there and start. The wood isn’t going to sand itself!
Until next time, keep your blades sharp and your sawdust pile high.
— Tony